Easing Into Downward Facing Dog
/Because of its funny name, the Downward Facing Dog pose is one of the most well-known yoga postures. Even people who have never done yoga recognize it. You can find Downward Facing Dog in most yoga styles, which means you’ll see it in most yoga classes.

One of the reasons it’s so common is that Downward Facing Dog is an excellent posture for transitioning from one pose to another. It’s used so frequently that it’s considered a foundational pose in our modern yoga practice.
That doesn’t mean it’s easy.
If you’ve struggled with Downward Facing Dog or find the posture uncomfortable, read on to learn more.
What Is Downward Facing Dog?

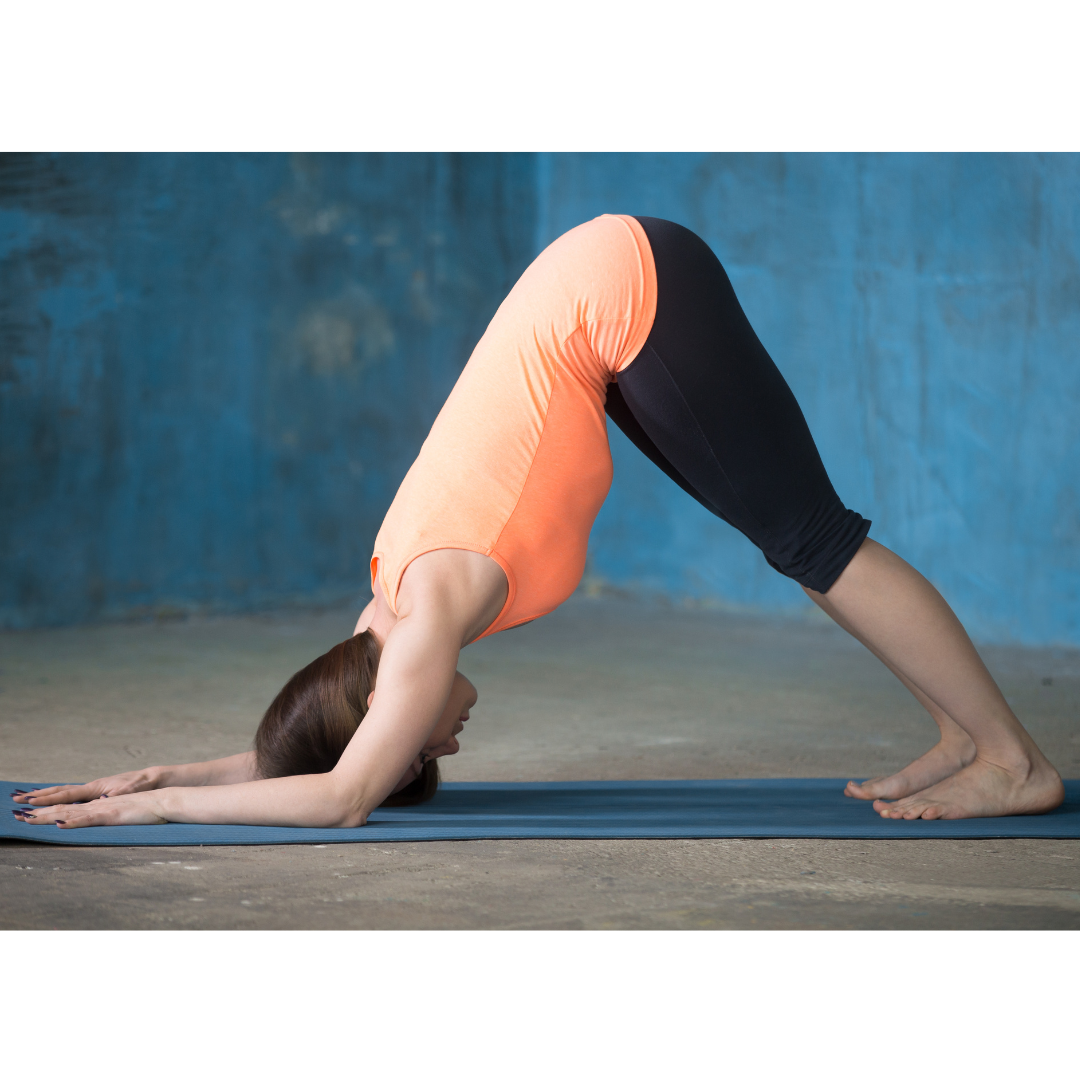
Downward Facing Dog is a full-body yoga pose. To enter Downward Facing Dog, the yogi presses their hands and feet into the mat while lifting their hips in the air until their arms and legs are straight, though modifications for the legs are common and well-known, to create an inverted “V” shape.
If you’ve never tried it, it looks simple enough. However, it becomes more challenging when applied to bodies that spend most of their time sitting at desks or on couches, often crouched over phones or laptops.
To accomplish the full expression of Downward Facing Dog, your palms must be on the mat and the soles of the feet moving toward being on the mat or fully down. (*Due to structural differences in the ankle joint and tight hamstrings, this may not be possible for everyone. If you are unable to reach your heels all the way to the ground, you can choose to reach them toward the ground or you may put a rolled blanket or wedge under your heels to ground them. Most yoga students are unable, it’s been our experience over 16 years, to get the heels down and still retain a long spine.) Your back and legs should be as straight as possible. You hold your hips and tailbone high to create an equilateral triangle with your body, with your yoga mat making the bottom side. There is an equal balance of weight between the upper and lower body, with your weight distributed into the earth evenly through your hands and feet.
You must be both strong and flexible to achieve the triangle shape of Downward Facing Dog pose. Downward Facing Dog requires flexible hamstrings, calves, and shoulders. The muscles on the back of your legs lengthen and stretch to create the triangle shape. The fronts of your shoulders must also be flexible enough to reach your arms up over your head to ensure a flat back. Getting into Downward Facing Dog requires core strength and strong hip flexors (psoas and iliacus) to lift your hips and tailbone into the triangle's peak.
Now that we’ve described the posture, let’s talk about how it can look in real bodies!
3 Common Problems with Downward Facing Dog
Problem 1: Not Using Your Hands Correctly
Planting the entire surface of the palms on the mat and spreading the fingers wide to create a strong foundation for the pose is essential. It creates more surface area for the weight transfer from your body to the earth beneath you. The crease of the wrist should line up parallel to the top of your mat. The weight should role toward the triangle (triad) formed by the thumb and the forefinger, so that the pinkie finger is light. Not placing the palms down entirely or placing the hands, failing to roll the weight toward the triad, and placing the fingers on the mat turned in or out can lead to wrist and arm pain or injury over time.

Problem 2: Compensating for Lower-Body Tightness
Not everyone’s hamstrings or calves will allow them to bring their heels down to the mat in Downward Facing Dog (and that’s fine!). The structure of your ankle joint may prevent your heels from reaching the mat. If your lower body is tight and your heels are nowhere near the mat, your Downward Facing Dog may feel uncomfortable. That’s because the tightness in your lower body causes you to shift your weight forward, forcing more weight down through your wrists. Ouch! Therefore, a generous bend in the knees is one of the most common options in this pose.
Problem 3: Rounding Your Spine
We tend to round our bodies forward and hunch our shoulders over devices. Your shoulders and chest can hold a lot of tension from stress. All this tightness in the shoulders can lead you round your spine in Downward Facing Dog, putting excess pressure on your wrists. Or it can lead you to work harder to make the “correct” shape, actually creating more tension over time.
Exploring Your Posture Can Improve Your Practice
Taking a good look at your Downward Facing Dog can help you identify places in your body that need stretching or strengthening. Once you’ve identified these “blind spots,” you can work with your yoga teacher to help correct your posture. Your teacher may also suggest specific stretches, poses, or self-myofascial release using foam rollers or therapy balls.
Self-myofascial release helps to:
Relieve muscle tension
Create space for muscle movement and growth
Increase range of motion
Improve athletic performance
Self-myofascial release helps hydrate your fascia and keeps it moving smoothly within your body so that you can move into Downward Facing Dog more easily.
Build a Better Downward Facing Dog
You can modify Downward Facing Dog in several ways to suit your body better, depending on which problem is causing you discomfort in the pose.
Start with a Strong Foundation
Your hands should be shoulder-width apart on the mat. Plant your palms firmly, with your fingers spread wide. Make sure your wrist crease lines up with the top of your mat and your entire palm touches the mat. Roll the weight toward the triad of the hand rather than to the outside edge of it.
Your feet should be hip-width distance apart, and your legs should align with your hip joints. Begin with toes curled under, toes a little bit in and heels or little bit out, and draw your heels closer to the mat as you rise.
Liftoff!
Even though it feels like your body is moving backward, the front of your body is responsible for lifting your hips. As you press your hips up and back, engage your core by pulling the navel to the spine to support you and use your hip flexor muscles to draw your thighs toward your abdomen.
Adjust and Explore
As you arrive in Downward Facing Dog, adjust your stance as needed, bringing your feet closer to your hands, or moving them further away. Make sure your Downward Facing Dog and High Plank have the same distance between hands and feet to avoid “shimmying” in the pose, which can place more pressure on the wrists.
If you can’t bring your heels down to the mat, bend your knees so that you can shift your weight backward and off of your wrists. Explore your flexibility by “walking your dog” or alternately pressing down one heel and then the other.
Variations for the Win
If you’re injured or need strength to work your way up to Downward Facing Dog, try a variation.
For wrist injuries, try Dolphin pose. It is similar to Downward Facing Dog but done with forearms down. Dolphin pose can help you open your shoulders and find flexibility in your lower body. It requires core strength and strong hip flexor muscles, so it’s an excellent pose to explore and incorporate into your practice.

Tabletop is another excellent pose for transitioning between yoga postures and doesn’t require the same level of strength or flexibility. Depending on the yoga practice, Tabletop can often be used as a transition pose between a Lunge or Plank and Downward Facing Dog as you work to build core strength.
Yoga Is a Practice
Downward Facing Dog, which also is considered a resting pose for many students, may not be the easiest pose for many of us, and that doesn't mean we should avoid it. Getting to know this posture better and exploring variations can help you learn more about your body and become aware of how you move. In yoga, as with everything else, awareness leads to growth.
Deepen Your Practice

Ashley is passionate about sharing the power of yoga, movement, and philosophy to help her students open themselves up to vibrant health, joy, and connection to self. She was a yoga practitioner for years before being called to share this beautiful practice with others. After discovering the transformation that yoga can offer, Ashley was inspired to help others who feel disconnected from their body and spirit. Today, Ashley helps her students connect with their potential through yoga, meditation, and self-love. Ashley is devoted to deepening her yoga knowledge and earned her RYT-500 advanced training in 2022. She has studied many yoga modalities to serve her students’ unique needs, including Vinyasa, Hatha, Yin, pre-and post-natal, Yoga Nidra, meditation, and Yoga Tune Up®. When she’s not on the mat, Ashley enjoys cooking, gardening, traveling, and spending time with her husband and cats.